Measurements in electric circuits done with multimeter
Measurements in electric circuits done with multimeter
The following texts are the property of their respective authors and we thank them for giving us the opportunity to share for free to students, teachers and users of the Web their texts will used only for illustrative educational and scientific purposes only.
All the information in our site are for educational uses.
The information of medicine and health contained in the site are of a general nature and purpose which is purely informative and for this reason may not replace in any case, the council of a doctor or a qualified entity legally to the profession.
Measurements in electric circuits done with multimeter
Measurements done with multimeter
The multimeter is one of the most used device in electronics,with determiantion and measuring electrical quantities functions. With the development of integrated circuits the digital multimeter appeared whose main difference from the analog display is how the result is displayed- in the liquid crystal display(LCD).
Measurable quantities with multimeter:
- electrical resistance- measuring unit Ohm (Ω);
- voltage – volt (V)
- alternative voltage (~);
- continuous voltage(=);
- intensity of electrical current – amper (A);
- direct current(=);
- alternative current (~);
Besides this electrical quantities, multimeters also provides the oportunity to check how function some components, like (it can appear differences between different types of multimeters):
- resistance ( by direct measurement on ohmic scale);
- semiconductor diode;
- electrical capacitance;
- bipolar transistors;
For describing how to work with the multimeter we will use the following notations:

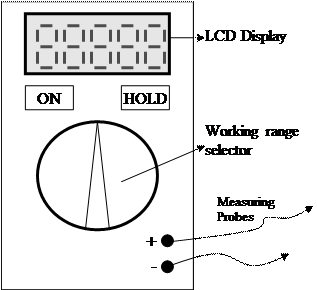
- button ON - allows to start/ close the multimeter
- button HOLD - allows us to mantain the value showed on the diplay until pressing the button (the measurement can’t be made with the button pressed);
- working range selector- allows you to select the working mode of the device( measure quantities and determine the components) as well as the measuring range for electrical quantities.
Measurement circuits schemes using multimeter:
- Voltages measurement:
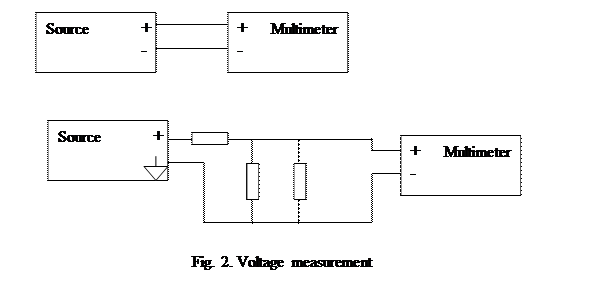
To measure the voltage the multimeter can be connected everywhere in the circuit, the value shown represents the voltage between those two test points.
Example of connection:

Dc voltage measurements (simbol V=)
We switch the range selector on one of the positions for DC voltage measurements. The selected inscription is the maximum amount which can be measured on that scale. The two cords must me connect the two points between which we want to measure the voltage, red cord represents + and the black cord is -.
Read the display. If voltage value is greater than the maximum of that scale, on the display we read 1 and change the switching range on a scale with bigger values. If the displayed value is negative then the polarity of the measured voltage is reversed to the voltage corresponding to + at the red cord and – at the black one. If we switch the cords between them than the displayed value doesn’t have sign, in this case we can say that the node where is connected the red cord has bigger potential.
AC voltage measurements V~
We switch the range selector to one AC voltage measurement positions and connect the measurement cords to the points of measurement. Then we read the displayed value, which represents the effective value of AC voltage measured.
Be careful when you measure the tension from the outlet!
- Measurement of electrical currents
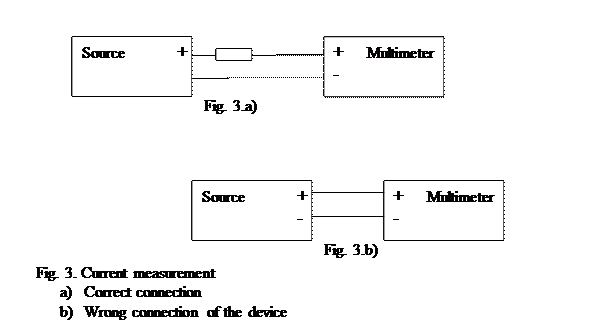
When measuring the electrical currents we must consider the following basic rules, before connecting the device:
- the red cord of the multimeter must be connected to the device’ jack corresponding to the domain of measurement estimated (if we assume that there are large currents in the circuit, firstly we connect the terminal „Amperi”)
- always avoid shorting voltage sources with the multimeter. Current measurement is always made by inserting the resistance which determines the current, otherwise the multimeter si damaged( it burns!)

- Measurements of resistance
On this scale the multimeter measures the electrical resistance between two points of the circuit or the electrical resistance of a component. We should mention that the value of a resistence is shown on it’s body either in numerical value, either using the code of colors. In addition to we must also write the tolerance value, i.e. the maximum deviation (guaranteed by the manufacturer) of the real value of resistance from the nominal value.
With the range selector on a Ω position and the cord free the device indicates 1 (domain overflow, a normal thing considering theat the electrical resistance between two wires in air is very big).
If the cords are shorted then the device must indicate 0, otherwise it means that the two probes are broken or the device battery is low.
The measurement of electrical resistance is made only in the absence of voltage or on separate components circuit. The measurement of a resistance placed in circuit can determine reading an erroneous value because of the electrical circuit loops.

- Determine the functionality of semiconductor devices
Also on the positions “ohmetru” is the position for checking the diodes and bipolar transistors. In direct sense,i.e. the red cord is on ANOD and the black cord on CATOD, the device indicates 0 or a small value, usually up to hundreds of ohms, and if we connect opposite the cords the device will indicate 1, that is field overtaking.
Bipolar transistors verification is made as if there were two diodes( diode base- emitter and base- collector diode).
For example, at an NPN transistors the red cord is connected to the base and we check the emitter and collector terminals to indicate a low resistance (hundreds of ohms). Put the black cord on base and the device must indicate a break at emitter and collector.
Radioamateur observation:
If we have a NPN transistor, we put the red cord on collector, black cord on emitter, keep well with our hands the two terminals and put the tongue on the transistor base, it indicates hundreds of ohms( the transistor is polarised through the resistance of human body).
- Determine the continuity of electrical paths
Also on the ohmeter scales is the position „buzzer” used for checking the electrical continuity between two points. If a short-circuit is made between the two cords of the device,a sound must be heard, in that moment we check only the device. Then the cords are positioned between the points we want to check the electrical contiuity, if the device becomes noisy it means we have electrical continuity.
Continuity checking is always done in the absence of measuring circuit voltages , otherwise the device can be damaged!
- Capacity measurements at capacitors(F)
This function si found only on some digital multimeters, not being available on general paths (hobby).
We put the range selector o none of the positions for electrical capacity measurement. The capacitor is introduced in the special clamps for capacitors measure.
If the device doesn’t have this function we can determine if we have a pierced capacitor by measuring i ton the ohmic scale (very small resistance), but the measurement is not 100% sure, therefore is not recommended.
Course Work
1. Measure the values of the components and compare the measured values with the nominal values. Complete the following table for different resistances and capacitances:
Toleranta |
|
|
|
|
|
|
Val.nominala |
|
|
|
|
|
|
Val.masurata |
|
|
|
|
|
|
2. Determine by direct measurement the voltage supplied to your mobile phones battery or ACpower. What influence has the measurement of a battery with de range selector on the position „Alternative voltage”?
3. Choose a resistance a o known value and connect it in series with the device and a batery with a known voltage. Measure the current in the circuit and check Ohm’s Law.
4. Determine the anod at the provided diode and check if the diode are working or are damaged.
Source : http://ftp.utcluj.ro/pub/users/peculea/CAN/Laboratoare/Multimeter.doc
Web site link to visit : http://www.utcluj.ro/
Google key word : Measurements in electric circuits done with multimeter file type : doc
Author : not indicated on the source document of the above text
If you are the author of the text above and you not agree to share your knowledge for teaching, research, scholarship (for fair use as indicated in the United States copyrigh low) please send us an e-mail and we will remove your text quickly.
Measurements in electric circuits done with multimeter
If you want to quickly find the pages about a particular topic as Measurements in electric circuits done with multimeter use the following search engine:
Measurements in electric circuits done with multimeter
Please visit our home page
Larapedia.com Terms of service and privacy page