Thin layer and column chromatography
Thin layer and column chromatography
The following texts are the property of their respective authors and we thank them for giving us the opportunity to share for free to students, teachers and users of the Web their texts will used only for illustrative educational and scientific purposes only.
The information of medicine and health contained in the site are of a general nature and purpose which is purely informative and for this reason may not replace in any case, the council of a doctor or a qualified entity legally to the profession.
![]()
Thin layer and column chromatography
Chemistry
Thin Layer and Column Chromatography
Introduction
Chromatography is an effective and very useful method for separation and purification of organic compounds that can be used even for complex mixtures. Chromatography separates components of a mixture based upon how well they are adsorbed on an inert phase (the stationary phase) versus how well they dissolve in a liquid phase (the mobile phase) (Figure 1). A mixture is introduced to a chromatography system and the components with greater affinity for the mobile phase (white circles) will move (elute) faster than those components with greater affinity for the stationary phase (black circles), causing the components to separate.

The stationary phase is a solid, inert material that contains a polar functional group, and therefore polar compounds have a greater affinity for the stationary phase. Because the selection of stationary phases is rather limited, it is the mobile phase (an organic solvent) that usually is changed, which is easy to do. The best solvent depends on the mixture of compounds to be separated, and may range in polarity from alkanes (for example, hexane) to alcohols (methanol). An increase in the polarity of the mobile phase increases the rate of elution for all compounds in a sample. Therefore, if the compounds elute too slowly, the remedy is to increase the polarity of the mobile phase. On the other hand, if the mixture doesn't separate well because all components move too fast, a switch to a less polar solvent is needed. Often, just the right polarity is achieved by mixing a small amount of a polar solvent with a non-polar one. The optimum mobile phase mixture is determined by trial and error, usually using thin-layer chromatography, as discussed below. Your lab class will determine which mixture of dichloromethane (more polar) and pet ether (less polar) provides the best separation of tomato pigments.
In this laboratory, you will experiment with two types of liquid chromatography: thin layer chromatography (TLC), in which the stationary phase is coated on a plate of glass or plastic, and column chromatography, where the stationary phase is packed into a glass column.
Thin Layer Chromatography (TLC)
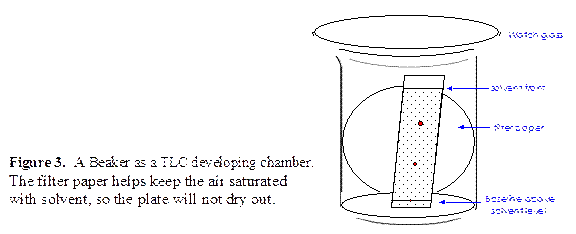
Figure 2 illustrates thin layer chromatography (TLC), the simplest and fastest liquid chromatography technique. A spot of the mixture to be separated is placed on the baseline near the bottom of the TLC plate. The liquid mobile phase (either a single solvent or mixture of solvents) is drawn up the plate, passing the spot of the mixture, when the TLC plate is placed in a developing chamber, which contains the mobile phase. (Figure 3) The solvent will be drawn up through the stationary phase by capillary action, and the solvent front moves up the plate. As the solvent passes the spot where the sample was applied, the sample will begin partitioning between stationary and mobile phases, and separation will occur (see Figure 2). The ratio of the distance traveled by a particular spot, compared to the distance traveled by the solvent front (both measured from the baseline) is called the Rf value. The best separation of components generally is achieved when the solvent polarity is adjusted so that the compounds being separated have Rf values in the range 0.4 - 0.6. Rf values are helpful in identifying compounds, especially when you have an authentic sample for comparison.

The developing chamber can be as simple as a covered beaker (see Figure 3). Keep the depth of the solvent below the level of the baseline. To maintain the developing chamber saturated with solvent vapor, place a piece of filter paper along the inner wall of the beaker - this serves as a wick to ensure solvent saturation. Set the plate in the chamber on the baseline edge.
It is very important to take care during sample application to keep the sample spot small. You will observe clear separation when the spot applied at the baseline is small (Figure 2c), but if the original spot is too large (Figure 2d), the components will be run together.
You will use TLC later in the semester to monitor the progress of a reaction - as the reaction proceeds, the spot due to the starting material diminishes, and that of the product dominates. Side products or impurities are evident as additional spots. In this experiment, you will separate colored pigments, and most of the spots will be visible to the eye.
However, many organic compounds are colorless, and the spots on the TLC plate must be visualized differently. Some compounds fluoresce and are visualized under an ultraviolet (UV) lamp. A different technique involves the use of TLC plates that have a fluorescent material bound to the stationary phase. Many organic materials prevent (quench) the fluorescence. When observed under an ultraviolet lamp, the plate glows, except for dark spots that mark the location of the organic compounds. Another method is to place the developed plate in a jar containing a few crystals of iodine. Iodine vapor stains the organic compounds brown.
A key limitation of TLC is that the amount of material that can be separated is quite small, so TLC is normally used for visual analysis of mixtures, but not to obtain pure samples. Preparative-scale purifications are more typically accomplished by column chromatography

 Column Chromatography
In column chromatography, the stationary phase is packed into a vertical tube. Apply the sample to the top of the column and allow the mobile phase to percolate down through the stationary phase. The various components separate as they move down the column and are collected individually as they elute from the bottom of the column. Normally, the column will have a stopcock at the bottom to control the flow of mobile phase.
The column is normally a glass tube with a stopcock at one end. Pack the stationary phase evenly and efficiently for column chromatography (Your TA will demonstrate). Air spaces or gaps in the packing will cause the elution of different parts of the sample to proceed at different rates, and this will adversely affect the separation of components. Once the column is packed, it is absolutely critical to avoid letting the top of the column dry out.
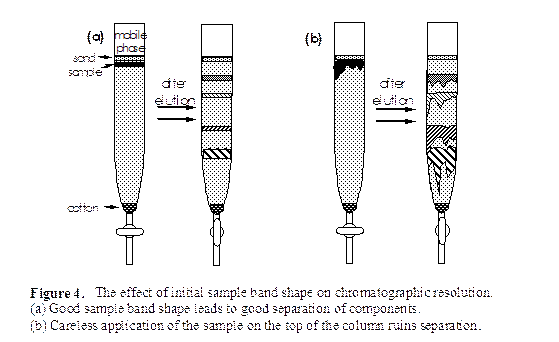
Application of the sample to the top of the column must be done with great care. Follow the procedure carefully and place the mixture as a thin, even band at the top of the column. The profile of the sample at the start is maintained during elution of the column. If you apply the sample carelessly, you will not be able to separate closely eluting components (see Figure 4). Control the rate of elution by adjusting the flow through the stopcock. If the level of solvent drops below the top of the column, air pockets and cracks will develop in the packing. This will lead to uneven elution. Therefore, control the solvent level during the sample application procedure just to the top of the packing. During elution, keep the level of mobile phase at least 3 cm above the top of the packing, replenishing as needed.
The elution rate also affects the separation efficiency. Fast elution will distort the band shape of the sample from a disk to a conical profile, as the material in the center of the column moves faster than that near the edge. With proper care, you will be rewarded with a nice separation of bands, corresponding to the different components of the mixture. Each band can be collected as it elutes from the end of the column in a separate test tube. When the compounds are visible, as in this experiment, your eye will serve as a detector to determine when a compound is coming off the column. For colorless organic materials, small fractions are collected blindly - these are then analyzed separately, often by TLC, to determine which fractions contain which components.
Pigments in Tomatoes and Carrots
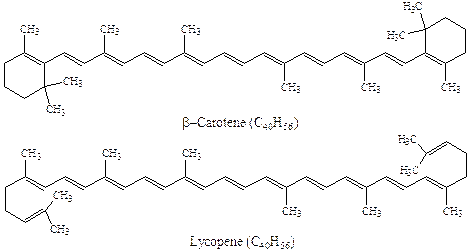
You will isolate two pigments, b-carotene and lycopene, from tomato paste and strained baby carrots. First you will extract the crude pigment mixture from the tomato paste, and then you will use chromatography to separate and purify the crude extract.
 Experimental Procedure
The crude pigment extract from tomato paste will be analyzed by thin layer chromatography, and the lycopene and b-carotene will be purified by column chromatography.
Safety Notes!
Ethanol and petroleum ether are extremely flammable! Keep them away from flames and sources of electrical spark.
Dichloromethane is toxic and has been categorized as a carcinogen. Avoid inhalation, ingestion, and contact with skin. In case of accidental contact, wash with copious amounts of water.
All solvents and other waste materials must be discarded in the containers provided.
A. Extracting Pigments from Tomato Paste
Weigh 6 g of tomato paste and 4 g of strained carrots into a small Erlenmeyer flask. Record the weight. Add 10 mL of 95 % ethanol (The alcohol will carry away most of the water.), and mix thoroughly with a spatula. Remove the dehydrated pastes with a spatula, squeezing out as much of the ethanol as possible, and place the resulting paste on a filter paper. Fold the filter paper and squeeze the paste further. Transfer the paste into a dry Erlenmeyer flask. Add 10 mL of dichloromethane and again mix thoroughly with a spatula. Allow the pastes to sit in the dichloromethane, with occasional stirring, for 5 more minutes. Transfer the dichloromethane containing the pigments to a clean Erlenmeyer flask using a disposable Pasteur pipette. Add 1 g of anhydrous sodium sulfate to the dichloromethane mixture and swirl the flask – add more if necessary to obtain a clear, dry solution. Filter the dry organic solution through a funnel fitted with a very small cotton plug, collecting the solution in a 25 mL round bottom flask. Remove most of the solvent using a rotary evaporator under vacuum, leaving approximately 0.5 – 1 mL of solvent. Add 1 mL of petroleum ether to the concentrated solution for TLC analysis and column chromatography separation as described below.
B. TLC Analysis of Pigments in Tomatoes and Carrots
Your TA will assign to you one of the following solvent pairs for TLC analysis of the pigment solution obtained in Part A. The class will decide which solvent system provides the most effective separation. Keep all solvent mixtures covered to minimize evaporation, which would cause a change in the composition of the mixture.
5% dichloromethane/95% petroleum ether
10% dichloromethane/90 % pet ether
15% dichloromethane/85% pet ether
Curl a small (7 cm) circle of filter paper around the inside wall of a clean, dry 150 mL beaker (see Figure 3). Prepare 10 mL of the solvent system assigned to you, and add 8 mL (a depth of about 3 mm) to the beaker. Swirl to facilitate saturation of the chamber with solvent vapor, cover with a watch glass, and let stand for a few minutes. Obtain a silica gel thin-layer chromatography plate. Draw a pencil line across the width, 7 mm from the bottom edge. Dip a TLC spotting capillary into the pigment concentrate (Be certain that pigment solution has been drawn into the capillary!), briefly touch the end of the capillary to one of the TLC plates on the pencil line, and blow gently on the resulting spot to evaporate the solvent. Make two additional spots, spaced about evenly apart across the bottom of the plate on your baseline. Use 3 and 9 touches, respectively, to achieve substantially different amounts of sample on the three spots. (The heavier applications might reveal more minor components.) Stand the plate with the baseline edge down in the developing chamber – The spots must be above the solvent level – replace the watch glass, and watch the solvent front rise up the plate. When the solvent front has reached within 1-2 cm of the top of the plate, remove the plate, and mark the position of the solvent front. (It will dry quickly.) Circle the visible spots with a pencil - they tend to fade. You should be able to see the red-orange lycopene, perhaps the yellow b-carotene, and perhaps others. Develop the plate in an iodine chamber and mark any additional spots that show up. (Check the baseline, too.) Determine the RF values for all the spots, make an accurate sketch of the TLC plate in your notebook, and record the RF values.
C. Column Chromatography Separation
Weigh out 18-20 g of silica gel in a beaker. Suspend the silica gel in 80 mL of petroleum ether, swirling until you obtain a homogenous slurry. Let the mixture stand while you prepare the column. Obtain a chromatography column and make sure that it is clean and dry. Clamp the column in a vertical position. Close the stopcock. Swirl the silica gel slurry and quickly add the suspension to the column using a powder funnel. Apply a vacuum to the standing slurry and remove the solvent to within 1 cm of the top of the silica. Rinse the silica gel beaker twice with 20-30 mL portions of petroleum ether, and add these to the column also. After the solvent have been drained off of the column by vacuum, close the stopcock and add the removed solvent back to the top of the column. Do this three times. Make sure that there is 4-5 mL of solvent above the level of the silica gel, and add 1 cm of sand to the top.
Drain the solvent down into the top sand layer, but not down to the silica gel. Add 0.5 mL pet ether: 0.5 ml methylene chloride to the flask with the pigments and take the pigment up in a Pasteur pipette and very carefully add to the top of the sand as possible. Drain enough solvent from the column so that the top of the solvent is once again even with top of the sand layer. Add 5 mL of pet ether to the column and drain the pet ether to the top of the silica. At this point, all of the sample should be adsorbed as a relatively narrow band on the top of the silica gel column. No sample should remain in the sand or on the column wall above the sand. Carefully (to avoid stirring up the sand) add about 10 mL of pet ether. Begin the flow of solvent by opening the stopcock and carefully applying a vacuum. Continue adding solvent to the column until a total of 25 mL has been added. Discard the initial solvent (about 20 mL) eluting from the column. Increase the concentration of the solvent to 10:90 methylene chloride: pet ether. Collect the b-carotene fraction (very light yellow band) in a round bottom flask. The lycopene fraction should be visible as a red-orange band that moves down the column more slowly than the b-carotene. Switch to a solvent of higher eluting power (use 50% dichloromethane: 50% petroleum ether) to elute the lycopene band. Collect lycopene in a round bottom flask as it comes off the column.
Finally, run a TLC of the purified samples. Before TLC analysis, concentrate the solution using the rotary evaporator, leaving about 1–2 mL of solvent. Do not remove all of the solvent. Both b-carotene and lycopene should be run simultaneously on the same TLC plate with a spot of crude starting material as a reference. Spot each sample twice on the plate. Use 5 touches for each spot, ensure you have sufficient material to see. Develop the plate using the optimized solvent system from step B. Determine the Rf values of the lycopene and the b-carotene. Do not record the final volumes or masses of either lycopene or b-carotene.
Clean-up: When finished, the extra mobile phase should be drained from the column. Attach the tip of your column to a filter flask fitted with a one-hole stopper. Connect the filter flask to the vacuum source and pull the solvent from the column into the filter flask until the packing is dry. You can now invert the column and the loose packing should come out easily into the “Solid Unwanted Materials” box. The TLC plates, and tomato paste/carrots solid also go in this box. All of the used solvents, pigment solutions, etc. should be poured into the “Liquid Unwanted Materials” container.
Source : http://www.chem.missouri.edu/chem2050/Chromatography%20S04.doc
Web site link: http://www.chem.missouri.edu/
Google key word : Thin layer and column chromatography file type : doc
Author : not indicated on the source document of the above text
If you are the author of the text above and you not agree to share your knowledge for teaching, research, scholarship (for fair use as indicated in the United States copyrigh low) please send us an e-mail and we will remove your text quickly.
Thin layer and column chromatography
If you want to quickly find the pages about a particular topic as Thin layer and column chromatography use the following search engine:
Chemistry
Thin layer and column chromatography
Please visit our home page
Larapedia.com Terms of service and privacy page
